
PERSONALIZE YOUR DESKTOP!
The Thelio Maker Accent, is a paintable, etchable, DIY accent for making your Thelio Desktop feel more…you.
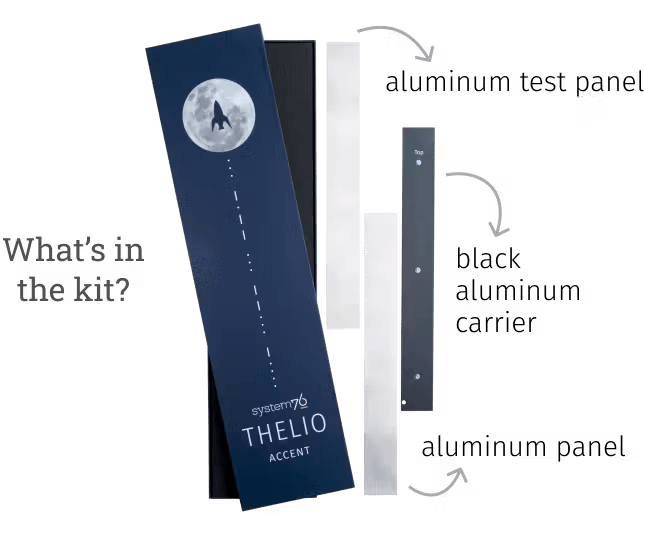
Here’s what the Maker Accent kit includes:
- 1 black aluminum carrier
- 1 raw aluminum test panel
- 1 raw aluminum panel
Experimentation and mistakes are encouraged. We’ve included an extra aluminum panel just in case, and both sides of each panel may be used. When you complete a design you’re happy with, read through Part 2 of this instruction page for successful mounting to the carrier.

Guidelines
Cleaning
The first step for any Maker Accent should be to remove dust, dirt, and other small particles from the raw aluminum. (The side without the tape!) Just wet a rag with some rubbing alcohol and wipe your aluminum clean. If you have any robots present, they would appreciate a good wiping, too.
If at any point you decide to start over, use a paint stripper to get rid of paint, clean the panel thoroughly with soap and water, and then wipe the panel down with rubbing alcohol once more. You’re good to go!
Primer
Once your primer is applied, beautify the accent with acrylic, latex, or water-based paint. An oil-based paint can also be used, but keep in mind that it’ll take longer to dry and will dry unevenly.
If at any point you decide to start over, use a paint stripper to get rid of paint, clean the panel thoroughly with soap and water, and then wipe the panel down with rubbing alcohol once more. You’re good to go!
Finishes
Adding a layer of finish over your dry paint will bring a premium sheen back to your accent. For this, we recommend using a semi-gloss, eggshell, or matte finish. A high gloss finish can also be used, but will give the accent an uneven look.
If at any point you decide to start over, use a paint stripper to get rid of paint, clean the panel thoroughly with soap and water, and then wipe the panel down with rubbing alcohol once more. You’re good to go!
Vinyl
Some say it’s better than digital. If you plan to mount or stick an object to your accent, whether it’s a yield sign, glitter, or a miniature windmill, we recommend using Series 51 Permanent Adhesive. It holds up to the elements while maintaining that premium high gloss we keep mentioning.
For a matte, non-permanent solution, Series 31 Removable Adhesive can be used. Just keep in mind that you’ll have to reapply down the line to keep your joystick, fidget spinner, or Raspberry Pi mounted to your accent.
NOTE: Heat transfer vinyl (HTV) will melt through the tape used for mounting the panel to the carrier. If this happens, you will have to start over or apply new adhesive yourself.

APPLYING THE PANEL
Now that your masterpiece is complete, it’s time to apply it to the aluminum carrier. The steps for doing this are as follows:
A: Attach the carrier to the machine by aligning the three inserts with the three holes on the system. Make sure the “Top” end of the carrier is at the top of your system, or your Maker Accent will be mounted upside-down.
B: Remove the backing from the adhesive on the back of your panel. Keep the adhesive clear of dirt and other particles before step C.
C: Align the top of your DIY panel with the end of the carrier labeled, “Top”.
D: Guide your finger down along your accent to adhere it to the carrier. If you’ve applied it upside-down, pull the panel from the carrier, reset the tape if needed, and reapply the panel.
Thelio Maker Accent
DIY blank aluminum canvas of dreams